Showing posts with label halloween. Show all posts

Wednesday, October 24, 2012

Halloween Favorites

It's getting close to Halloween and we have several fun hairstyles just right for this fun time!  You can click on the label over on our sidebar called "Halloween" for the full collection but here are some of our favorites.  Simply click on the name underneath the picture and it will take you right to the original post.  Happy Haunting!

Monday, October 31, 2011

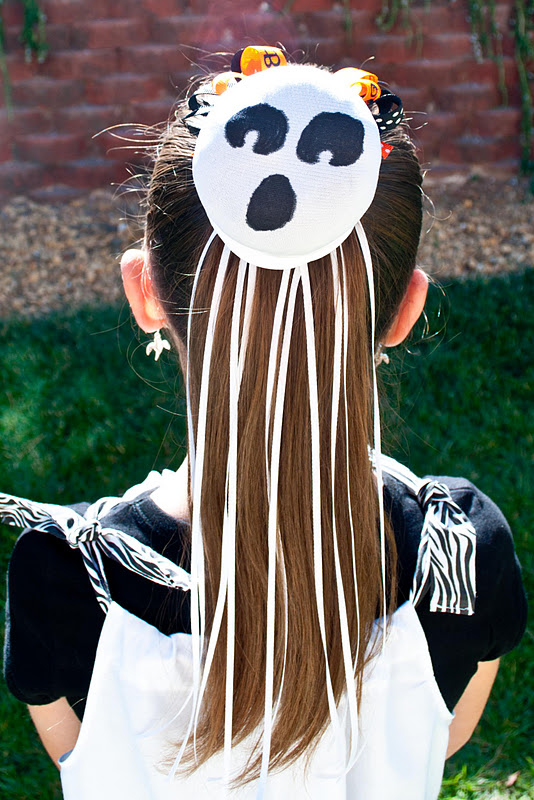
Haunted Hairstyle

HAPPY HALLOWEEN everyone!!!  We love this time of year because it is so fun to dress up and pretend.  We also love the candy - of course!  We have one final Halloween hairstyle today and it's called the "Haunted Hairstyle". 
Start by pulling all of the hair back into a tight ponytail.  Now grab a bun mold or a rolled sock and place the ponytail through it.  Spread the hair evenly over the bun mold and then wrap another elastic over the hair and mold to secure it into place. 
Comb the remaining hair, outside of the mold, straight down so it looks like a ponytail. 
Now grab a white knee-high stocking.  (I used the second one from the pack that I bought at the dollar store - I used the first on The Ghost.)  Draw a face on the knee-high with a permanent marker.  (Place cardboard inside the knee-high to prevent bleeding.)  Place the face part of your knee-high directly over the bun mold and then stretch the rest over.  You can adjust it as needed.  Add one final white elastic over the mold to hold the knee-high in place. 
 Grab some white ribbon for your last part.   Measure the ribbon against the length of the hair hanging down and then double it so that it is twice as long as the hair.  You can cut as many strand of ribbon as you like.  Take each strand and tuck them through that final elastic that you placed over the mold.  Make sure the middle of your ribbon is directly under the elastic so that you have two hanging strands.  You can tie the ribbon onto the elastic if you like but we did not do that and the ribbon held just fine.  You can either leave the hair straight at this point like we've done or you can curl it.  (I personally wanted to curl it but we ran out of time.)  Add a hair bow to the top of your ghost and you're all finished! 
My princess had a ghost in her hair to match the ghost on her pillowcase dress!  We hope you all have a safe and fun Halloween!

Friday, October 28, 2011

Friday's Film: The Ghost

We wanted to do a fun, yet simple, Halloween hairstyle for you this year so we came up with The Ghost. 
You will need a pair of white knee-high tights and I just found mine at the local dollar store.  Draw a ghost face on one stocking with a permanent black marker.  (Tip: Place some cardboard inside the stocking before drawing the face on to avoid any bleeding.)
Here are some pictures of the finished product topped with a ghost hair bow.
 It held really well all day long and everyone was stopping my princess to take a look at it.
 Happy Haunting!

Tuesday, October 25, 2011

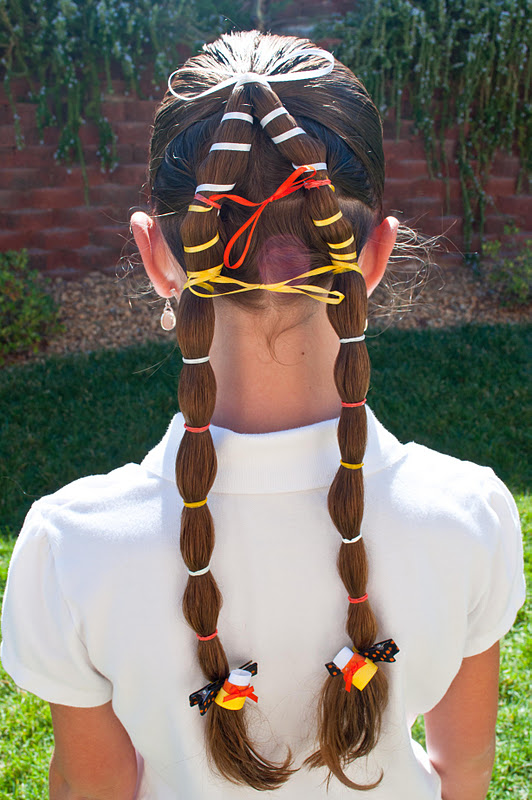
Candy Corn Revisited

I had done a post last year called Halloween Hairdos: Candy Corn and here is a picture of it:
I decided to try revisiting this hairstyle again this year and tweaking it a bit so that it is easier.
I started by pulling the hair half up - from ear to ear - and securing it in an elastic at the back of the head.  Divide the hair below the elastic in half by creating a part directly down the center.  Go ahead and divide your ponytail into two equal parts as well. 
Start by working on the left side and divide that in half horizontally so that it gives you two equal sections on that side.  Combine the left half of your ponytail with that top-left section of hair and secure it with an elastic.  Make sure to pull that new elastic a bit more to the left than your original ponytail but not all the way to the left.  Now combine your most recent ponytail with the bottom-left section of hair and secure it with a new elastic ALL THE WAY TO THE LEFT so that you have a triangular shape happening.  I chose to use white orange and yellow elastics but clear will work as well if you don't have the colors.  Go ahead and repeat those steps on the right half of the head. 
 I also finished off the ponytails by alternating the white yellow and orange elastics all the way down to the ends of the hair but this is optional.  Now grab some ribbons and a plastic yarn needle.  Start with white on the top and begin with a bow right over the main elastic.  Now continue wrapping the ribbon around the hair until you get to the next elastic.  At this point you will cut off any excess white ribbon and tuck the ends into the elastics.  Grab your orange ribbon and tie a large bow which you will place right over the middle part.  There will be no wrapping with this color but you will tuck your ends into the elastics to secure them.  Your final ribbon will be yellow and you will start again by tying a bow and placing it over the center part.  Now thread your needle and wrap the ribbon through the bottom elastics and the UP the hair and you will tuck your ends into those middle elastics.  (All of your ribbon ends will be secured and tucked into those middle elastics.)  Cut off any excess ribbon and hide the ends inside the hair. 
We finished our hairstyle off by adding some candy corn clips at the bottom of the ponytails since she had a whole candy corn theme going on. :)  (I found the idea for her outfit on Pinterest and I was so happy with how it turned out!  Plus I made it big enough for her to wear again next year!)

Wednesday, October 19, 2011

Halloween Hairstyles Recap

I wanted to post a few of our favorite Halloween Hairstyles since we are getting close to the big day! You can also click on "Costume Hair" or "Halloween" in the labels section on the sidebar for more ideas.  Just click on the name beneath the picture and you will be taken to the original post with instructions!
 The Great Pumpkin

The Coffin

Spider Rings

"BOO"

The Mummy

Monster Eyes

Spider Web

Cemetery

Candy Corn

Pumpkin Patch
Hopefully these will be some fun ideas for you to try and celebrate with!

Friday, September 16, 2011

Friday's Film: Angel Halo

This is a fun hairstyle that is really quite simple but takes a couple times doing it to get used to the flow of it.  The original post on this is here: Angel Halo.


We've also used this concept for Halloween Hairdos: The Great Pumpkin

And for The Rose Bowl.

The more you practice this hairstyle the easier it is to get it looking perfect!

Friday, June 10, 2011

Flashback Friday: Dorothy Hair

For Halloween 2008 my princess decided she wanted to be Dorothy from the Wizard of Oz.  This was perfect as far as her hair was concerned because it was the right color and the right length!
 
 Dorothy hair is pretty simple and it most often parted with a straight division right down the middle but we decided to make it a bit more modern and offset the bangs a bit. 
We created two even French Braids going all the way down the head and then we continued plating about 6 more times after all of the hair had been added in.
  We placed the elastic directly under the final plates of the braids and then curled the remaining hair into one large ringlet by using hot curlers.  She wore this style 4 days in a row - a dance performance, school, trunk-or-treat and then Halloween night so I got really good at it.  :)

Friday, April 8, 2011

Flashback Friday: Fairy Hair

flaFor Halloween in 2007, my princess was a fairy. 
We did a simple yet pretty look for her costume by pulling the top part of the hair up into to small piggies and then creating curling iron ringlets with the rest of it.  We sprayed her hair with spray glitter (which you can't really see in the picture) and added little flower clips to hide the elastics. 

Friday, October 29, 2010

Halloween Hairdos: Spooky Clips

This is our final post in the "Halloween Hairdos" collection and it's not really a hairstyle but I thought I'd include it anyway.  I've been getting a lot of comments on the clips that we're using in the pictures.  I thought I would show you some of our favorite Halloween clips and you are free to copy any ideas that you like.  (Even though time is quickly running out.)  :)  We only have one of each pictured below but I ALWAYS make two of each clip so I can do any hairstyle and have what I need.  I've made of few of these this year but most of them come from years past.  Hope you like them!
These are our ghosts and candy corns.  We also have a few Korkers that we love but this is one of our favorites.
Here is our candy collection and these were super simple because I just bought them already made in the scrapbook section of JoAnn's and then glued them to clips.
Here are our pumpkins.  There are so many ways to make a pumpkin clip and you can pick the ones you like the best.
These are our witches and black cats and we've also thrown in our Halloween Disney clip. 
This one is just everything else - a bat, a couple spiders, a scarecrow, a mummy, Frankenstein and the skull.  My princess loves the Skull and Cross Bones and I love the Frankenstein.  The Mummy was one that I made yesterday just to see if it would work and it turned out pretty cute.
These are our favorite ribbon clips.  They always look cute with braids or ponies. 

Wednesday, October 27, 2010

Halloween Hairdos: Kitty Cat

We found these cute little clips at our local craft store and thought they would be fun to incorporate in a hairstyle. 
My princess has really been wanting to try a Faux-Hawk hairstyle so we used it for these clips. 
Start by dividing the hair into 4 parallel sections horizontally across the head.  Gather each section up into it's own ponytail in the very center.  This will give you a row of 4 ponytails. 
Now you're going to wet them down really well and Barrel Roll them.  To Barrel Roll you will comb the ponytail straight up into the air and then wrap the ends around your two index fingers.  Now roll your index fingers over each other down towards the scalp.  This will roll the hair nice and evenly for you.  Secure your Barrel Roll down into the hair with a bobby in on each side creating an "X" inside the roll.
  Do this with your 3 other ponytails as well.  You will end up with a Mohawk look going down the head. 
 Now add your little clips up at the top and you have a kitty cat.
   Or you can also have a devil as well. 
We also have these little kitty cat ears from a while back.  They are just two simple brown pipe cleaners that we've wrapped her hair around.  We started with a small section of hair by each ear and then secured them in the middle of the head with a little barrette.