Showing posts with label ponytails. Show all posts

Friday, December 7, 2012

Friday's Film: Formal Ponytail Wrap

I originally saw a similar idea to this on Pinterest and I absolutely loved it!  
Ours is just a bit different but you can see how this way may be a bit simpler.  The link to this original pin can be found here.
The French Braid is not necessary but I do really like the look that it gives.  You could even pull this off with a twist instead of a braid if you like!
This picture shows you how we sectioned the hair.
Here's a view of the other side and the wrap.
My princess loved this hairstyle so much that I'm sure it's going to be a new regular for us!

Wednesday, July 11, 2012

Magic Wand

Today we have a really easy style that you can take pieces of to dress up any average ponytail.  First you will want to pull all of the hair back into a ponytail.  It can be low or high - doesn't really matter.
  Now grab a Topsy Tail and divide the ponytail into 3 equal parts, 1 in the top middle and two on the sides.  Begin with that top middle piece and feed it through the loop of your Topsy Tail.  Poke the tool down behind the elastic and pull the hair through.  Hold on to a bit of the hair that is closest to your elastic so that is does not get pulled all the way through with the rest of that section.  This will create a little bump right at the top of your elastic. 
Now take one of your side sections and repeat the steps, just making sure that you feed your Topsy Tail sideways behind the elastic.  Take your final piece and create your last side bump.  Now you will have three sections of hair coming out of the ponytail, behind the elastic. 
 
You can stop at this point and curl the ends if the hair is not too long.  For the longer hair you can use the three sections to create a Regular 3-Strand Braid. 
The braid will be the stick of the wand and the puffs above will be the top.  You could even jazz it up with some spray glitter if you wanted to.  :)

Monday, April 23, 2012

Butterfly Wings

My princess named this the Butterfly Wings because of the pretty shape that is created on the back of the head.  This hairstyle is great because it can work for an adult, a tween, or a young girl.  You will have the best results if you start with wet hair. 
Create a 2 inch part at the front of the head.  This can be placed wherever you like but we've done ours a little off-center. 
Now section out a piece of hair on each side of your part that go from the part down to the ear.  Have your princess hold those two sections while you smooth the rest of the hair back.  Twist those two sections tightly.  (You want to make sure that you are having the twists roll in toward the head - i.e. the right side will be twisting counter clockwise and the left side will be twisting clockwise.)  Pull both twist to the back of the head and secure them together with a small clear elastic.  Smooth out the hair below the elastic. 
 Now grab another small section of hair on each side just directly below those first twists.  Twist those two sections in the same direction as you did before and have them combine in the back of the head with an elastic. 
 Now make sure that you combine those new twists just below your first elastic.   DO NOT add in the hair from your previous twists.  You want your new elastic to lie over the top of that hair. 
Continue twisting new sections of hair from each side of the head and combining them in the back with elastics.  Once all of the hair from the scalp has been gathered, you are finished!

Tuesday, March 13, 2012

Draped Ponytail

Here's a very simple idea that adds a nice look to a normal ponytail.  I've seen some different variations on this all over Pinterest and I thought it would be fun to try.
Simply start with a regular ponytail.  Now have some small elastics on hand because you will need the as you go.  Grab a thin section of hair from the back of the ponytail and bring it around left side of the ponytail and across the front.
Twist it and have it drape just a bit.  Now grab a small section of hair from the right side of the ponytail and combine the two with an elastic.  Grab another small section from behind the ponytail and bring it around the front as well - twisting as you go.
 Have it drape just a bit below your previous strand and then add it into that same section from your right side with an elastic.  (About 1/2 inch below your first elastic.)  Continue this pattern all the way down the ponytail and then add one final elastic around the entire bottom of the pony to end it.  Add in some cute hair clips and you're finished!  Easy Peasy!

Friday, February 24, 2012

Friday's Film: Carousel Braid

This one has been floating around Pinterest and I really like the look of it. 
 This is our attempt at recreating the Carousel Braid and hopefully the video will help you as well. 
One of these days I will master the whole filming hair thing.  I still really struggle with creating a hairstyle from an angle.  :)
Here is what the finished product looks like.  Pretty huh!
Here is a side view and this braid looks good no matter how you look at it. 
This is a close-up of what we did on top of her head to start it all off.
We pulled the braid back to her ponytail, wrapped it around the elastic and then secured it in place with a Topsy Tail. 
For a fun little variation tey this "Squished Carousel Braid".  You basically just squish all of your twists up and secure the bottom elastic higher onto the ponytail.  Kind of neat how the add-ins all fan out!

Wednesday, February 22, 2012

That's A Wrap

Here's a different kind of ponytail wrap for you.  It's very simple and has a neat effect.
I started this hairstyle by sectioning out the top part of the hair from ear to ear and then dividing that into two parts.  I made a Pull-Through out of each part and then a Regular 3-Strand Braid out of each Pull-Through. 
I then pulled the two braids to the back of the head and combined them with an elastic and unplated any remaining braid after that elastic.  I then gathered all of the hair that was down into a ponytail - making sure to exclude the small ponytail from my two braids. 
I left the large ponytail alone and grabbed my smaller ponytail from my braids and added a new elastic about 1 inch below my first.  I then added 4 more elastics, separating each of them by about an inch.  Now my small ponytail had 6 total elastics - one securing my braids and then 5 others about an inch apart. 
 I grabbed my Topsy Tail and poked it directly through the middle of the first inch section of my small ponytail.  I did this by bringing my Topsy Tail in from behind this first time.  Now feed the large ponytail through the loop on your Topsy Tail and pull it all through that first section on the small ponytail.  Now you're going to feed your Topsy Tail through the second small section by feeding it from the front this time.  Place the large ponytail through the loop and then pull it through that section.  Continue doing this - alternating feeding the Topsy Tail from behind and from in front.  Once you have finished pulling the large ponytail through all of your sections you can combine the two ponytails with one final elastic at the bottom.  Add a hair clip and you're finished! 

Friday, February 17, 2012

The Stegosaurus

I've been having a lot of fun dressing up regular ponytails lately and here's another example.  We call it The Stegosaurus because it looks like the plates on it's back.
I'll start with the video because it will give you the general idea on how to make the rings:  
Remember that it is key to do this on wet hair so that the style will hold throughout the entire day. 
 Here is a view of the finished ponytail from the back.
You should be able to make it all the way down the ponytail as long as you segregate the strands of hair that you are creating your rings with.
Clear elastics seem to work the best because they don't stand out as much but you can use any type that you have.
Once you are done, you can go back and spread out your rings a bit to make them wider.  (This is totally optional.)

Monday, February 13, 2012

Heart Line

I don't know if you remember or not, but back when i had posted our "Heart Topper" hairstyle I promised to have another hairstyle up soon that uses the same concept.  Well, here it is!  Basically it's just a line of Heart Toppers going down a ponytail.  You can find the original post here and that will help you know what technique to follow to create your hearts. 
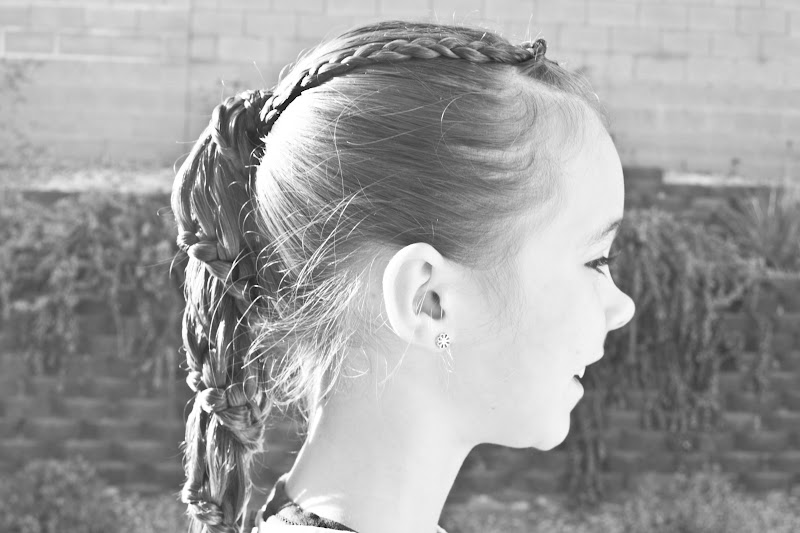
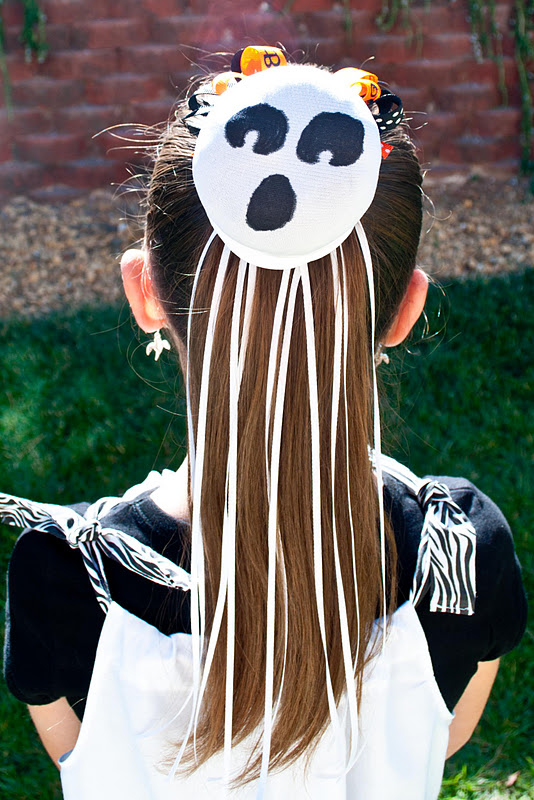
 I started with a small heart Pull-Through up at the front of the hair before pulling it all back into a ponytail. Once all of the hair was in an elastic I added some ribbon.  I added 3 strands of red that were the same length as the ponytail.  (The halfway point was secured under the elastic so I actually ended up with 6 strands of ribbon hanging down.)
  Looking back I wish I had done 3 different colors but I didn't think about it at the time.  It would have been cute to have different colored hearts.
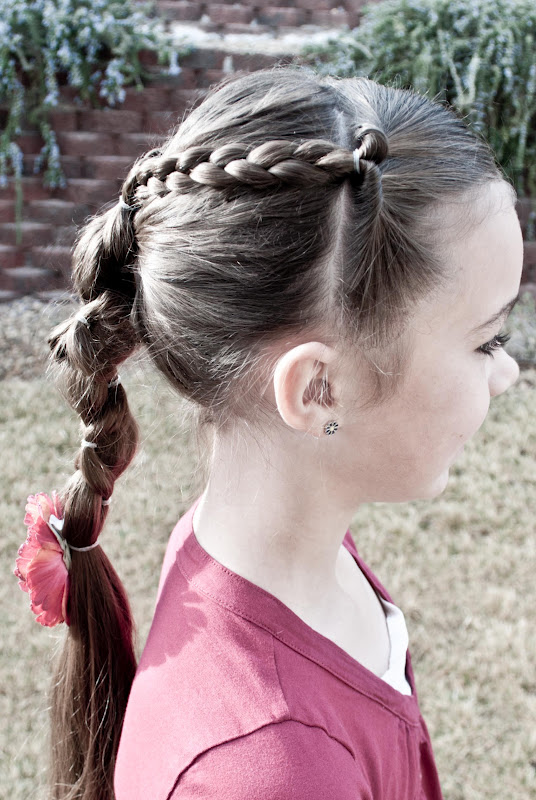
I created a "Heart Topper" and simply made sure to pull one ribbon strand in with both sides of my heart.  I continued this same process down the ponytail making one heart directly underneath the previous.  Also, be sure to alternate which ribbon strands you use so that you don't run out of ribbon.
When I got down to where I wanted to stop I secured one final elastic around the entire ponytail and then just clipped any remaining ribbon.
I added a heart hair clip to the bottom of my "Heart Line" and then curled the ends of the ponytail. 
*I think this hairstyle would be just as cute without the ribbon as well!*

Friday, January 13, 2012

Friday's Film: Swedish Piggies

We tried to get this video up as soon as possible because we had a lot of response on the hairstyle and many requests for a video.  I wish that the hair on the video looked a little more crisp and clean but you should still be able to get the general idea.

If you want to see pictures of the finished product as it should look, you can refer to the original post here. 

See, now wasn't that easy?!  :)

Wednesday, January 4, 2012

Swedish Piggies

Here is a hairstyle that we came up with one morning and it is one of my new favorites.  You will want to make sure that you start with wet hair and you can use a hair gel to help it hold if your princess has finer hair.  This style works best if the bang are grown out but you can also modify it if your princess has bangs that hang on her forehead.
Create a short, off-centered part at the front of the head and comb the bang area down toward each ear.  Comb the rest of the hair straight back. 
Begin with the left side of your part and comb the front bang area down by the ear and then around the back of the head and over behind the right ear. 
Gather a portion of the bangs from the right side of your part and combine that with your left section by securing it with an elastic just behind the right ear.  You should now have one small pony on the right side of the head and the rest of the hair still remaining down. 
 Grab a small section of hair from the right side now - from under the previous section and elastic - and smooth it across the head and over to the left side.  Grab a small section of hair from that left side to add to your new right piece and secure them together with an elastic.  You will now grab another section of hair from the left side and this time you will comb it over to the right and secure it into that ponytail that is already there with another elastic. 
 Keep doing this back and forth across the head so that you begin to have a swept look.   Once all of the hair has been gathered you are finished and should have only two piggies remaining.  You can leave the piggies loose like we've done here or finish them off with braids or curls. 

Friday, December 2, 2011

Friday's Film: KNOTty or Nice

It's going to sound completely crazy but this hairstyle totally came to me in a dream!  :)  How sad is it that I'm dreaming about hairstyles!  We call it the "KNOTty or Nice" because of the knots and also because it's the first Friday in December!
Pretty easy huh!
Here are some pictures of the finished product and I really like how it turned out.
This is the one that we did on the video and it's a Regular KNOTty or Nice style where the knots have not been pulled at all.
This is a Pulled KNOTty or Nice style.
The knots have been pulled really tightly and the excess hair drapes at the sides. 
Here is a side view of that.
This hairstyle is very versatile and this is what it looks like if you pull at the knots a bit and just play with the shape of it.
You'll notice that your hair below your final elastic may seem longer than with a normal braid and that's because your knots use up some of the length from your other strand so you'll have to secure it a bit higher.
Have fun playing around with it and seeing which way you like it best!

Monday, October 31, 2011

Haunted Hairstyle

HAPPY HALLOWEEN everyone!!!  We love this time of year because it is so fun to dress up and pretend.  We also love the candy - of course!  We have one final Halloween hairstyle today and it's called the "Haunted Hairstyle". 
Start by pulling all of the hair back into a tight ponytail.  Now grab a bun mold or a rolled sock and place the ponytail through it.  Spread the hair evenly over the bun mold and then wrap another elastic over the hair and mold to secure it into place. 
Comb the remaining hair, outside of the mold, straight down so it looks like a ponytail. 
Now grab a white knee-high stocking.  (I used the second one from the pack that I bought at the dollar store - I used the first on The Ghost.)  Draw a face on the knee-high with a permanent marker.  (Place cardboard inside the knee-high to prevent bleeding.)  Place the face part of your knee-high directly over the bun mold and then stretch the rest over.  You can adjust it as needed.  Add one final white elastic over the mold to hold the knee-high in place. 
 Grab some white ribbon for your last part.   Measure the ribbon against the length of the hair hanging down and then double it so that it is twice as long as the hair.  You can cut as many strand of ribbon as you like.  Take each strand and tuck them through that final elastic that you placed over the mold.  Make sure the middle of your ribbon is directly under the elastic so that you have two hanging strands.  You can tie the ribbon onto the elastic if you like but we did not do that and the ribbon held just fine.  You can either leave the hair straight at this point like we've done or you can curl it.  (I personally wanted to curl it but we ran out of time.)  Add a hair bow to the top of your ghost and you're all finished! 
My princess had a ghost in her hair to match the ghost on her pillowcase dress!  We hope you all have a safe and fun Halloween!