Wednesday, May 30, 2012

Back & Forth Puffy Braids

This style is a variation on one of our favorites, Puffy Braids.  You will be creating a series of horizontal parts as usual but the difference is that there is no vertical part down the center.
 
Start by creating a horizontal part from ear to ear and making a small section of hair along the bang line.  Secure it into an elastic that is pulled to the left side.  Now create a parallel part behind the first that you will secure into an elastic over on the left side. 
Create a 2 inch braid out of your left ponytail and have your princess hold it while you create a third parallel part/section.  Pull that section over to the left as well and add in the braid before securing it with a new elastic.  (Your braid will be lying over the top of your second section that is over on the right.)
Now move over to your right ponytail and create a 2 inch braid out of that as well.  Create a 4th part/section and pull it to the right where you will add in that braid and secure it with an elastic.
Now move back to the left and repeat the pattern back and forth from left to right. 
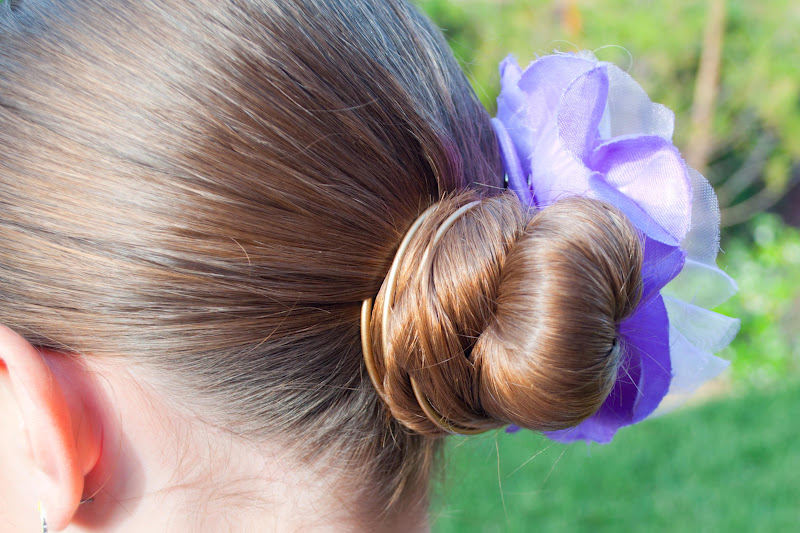
When you get to the bottom of the hair you will have one braid that ends higher than the other.  Finish off your final ponytails with Regular 3-Strand Braids and you are all finished! 

Thursday, May 24, 2012

Friday's Film: Python Piggies

(This is a day early but we are headed out of town for Memorial Weekend and I wanted to get this up for you!)
Here's a fun hairstyle that is not too hard but does take a good 15 minutes to complete.  Start with wet hair and make sure you have a Topsy Tail or similar tool handy. 
You can make your top section that you keep out as big or as small as you like depending on what you want your wraps to look like. 
Here is the finished product.
This angle shows you what the top looks like as you begin to wrap the hair around.
This one also shows the way we created our parts.
Very easy and really cute!

Wednesday, May 23, 2012

Basket Weaving

Here's a new one that we came up with today that is basically just a variation on our Swedish Piggies.  It looks difficult doesn't it!  That's the beauty of it, this is one of the most simple hairstyles to create!  We've called it "Basket Weaving" because that's exactly what it looks like but there is no weaving involved - thank goodness! 
You can start with wet hair or dry hair but I do find that the ends sty in place better with wet hair.  Make a small part coming off of your bang line that is about 2-3 inches long. 
It can be right in the center or off to ones side like we've done here.  I like how the bags look "swept" this way.  Now comb the remaining hair straight back. 
Gather a section on each side of your part going down to the ear and secure those sections into little piggies using elastics. 
You now have two new pieces of hair that you are going to work with.  Simply cross them over each other at the back of the head (over the rest of the hair) and tie a half knot.  (The first step when tying your shoelaces.) 
 Have your princess hold the left side while you gather a small section of hair on the right side just below that first elastic.  Secure the right side of your half knot in with that small section by using another elastic.  Do the same over on the left side.  You've now made the top of your "basket". 
You still have two pieces of hair to work with and you are going to cross those over each other to create a half knot once again and just repeat the steps as before.  Continue this process down the head until you have gathered all of the hair in from the sides of the head.  You may still have some hair hanging down and you can divide that in half and add it to each final piggie by securing them with elastics.  The style gives the really cool effect of being woven together when really it's just stacked.
  Told you it was simple!  

Monday, May 21, 2012

Hair Flowers

These beautiful Hair Flowers are courtesy of Jenn over at Girly Do's by Jenn and she is absolutely amazing.  The link to her official post for these flowers can be found here and it includes a tutorial video!
we did a simple style for church that incorporated these flowers and this is what it looked like.
First I pulled the bangs back and secured them under the hair, by the nape of the neck.  I then created 3 parallel sections on the top of the head and secured each one with an elastic. 
 My flowers ended up being larger than I had anticipated so I only created flowers out of my two outside sections.   I also added some twisty flower hair pins into the center of each flower.  (Don't forget to click here to see the instructional video on how to create these flowers.)  
We finished off the back of her hair by straightening it and then curling her ends under.
She looked beautiful and everyone loved the flowers.  Thanks Jenn!

Friday, May 18, 2012

Friday's Film: Skinny French Braid

Here's a fun hairstyle that I originally saw on Pinterest and that direct link is here.   I was unable to find any directions for it so this is what I came up with and the end result seems to be the same. 
We already have a hairstyle called "The Overlay Braid" so we didn't go with that name but it would definitely apply here as well.
Here's a picture of what the finished braid looks like.  It looks awesome over the top of the other hair!
Here is the back with the braid wraps around the piggies.
The top was kind of hard to see in the video so here's a picture of what it looks like. 
Here's another view of the braid.  Fun huh! 

Wednesday, May 16, 2012

The Bow Braid

This hairstyle is one that I've been following on Pinterest but could never quite figure out and the AMAZING Mindy over at Cute Girls Hairstyles posted a great video that you can find here.  Full credit goes to her and her perfect instructions that make this braid very "do-able".  She also got some fabulous variations that show the versatility of this braid.  Here's our version:
First we separated the hair directly down the middle of the head and created The Bow Braid out of the left half of the hair.  (The link to the instructional video from Mindy is above.) 
I absolutely love the look of this braid and the idea to it is really quite simple.  It does take some time so plan appropriately.  This hairstyle was supposed to have a Bow Braid on each side but we ran low on time so we came up with this instead. 
We added in the hair from the right side to the bottom of our Bow Braid and swept it over below the right ear.  We did this by doing a Half-French Braid and only adding in hair to the top half. 
We finished it off with a Regular 3-Strand Braid and secured it with an elastic and a little flip at the bottom.  
Remember to check out Mindy's fun variations because she's got some great ideas!

Monday, May 14, 2012

Princess Piggies is TWO!!!

I can't believe that we have been doing this blog for two years now.  It does not seem like it has been that long.  We started this blog as a way to share some fun ideas with ladies around the neighborhood that kept asking about the princess's hair.  I can't believe what it has grown into and what wonderful followers we have!  Thanks for all your comments and ideas and for the pictures that you share on our Facebook page.  You guys are all so wonderful! 

Happy 2nd Birthday to us!  :)

Sunday, May 13, 2012

Happy Mother's Day 2012!

I just wanted to give a shout out to all my lovely ladies out there in blog world.  I hope that you have a wonderful Mother's Day and take it easy!  Here's a style from last year for the big day:

It says "MOM" and you can find that original post here.  Sorry I did not have time to get a video up for this one as requested but there are written instructions on the post that will hopefully help.  :)

Have a great day all you wonderful moms!

Friday, May 11, 2012

Friday's Films: French 4-Strand & French 5-Strand

We've had more than a few requests for these videos so I'm finally getting them up for you. 
First of all we have the French 4-Strand:
 Hopefully that makes sense for you and will help.
Here's a picture of the finished French 4-Strand.  This is cool because it's half a French Braid and half a Dutch Braid!
You can see that this side is the "French" half.
And this side is the "Dutch" half.
We just finished it off with a 4-Strand Braid and secured it with an elastic. 
Next we have the French 5-Strand:
The fingering it definitely a bit more tricky as you plait this braid but it is one that gets much better after a couple practices.
 
Here's a picture of one of our finished French 5-Strand hairstyles and you can find the original post for this one here.
There is also this hairstyle that we did a couple weeks ago and it's a diagonal French 5-Strand.  That original post is here.

Wednesday, May 9, 2012

A Rose for Mother

This is our version of a little rose on the back of the head especially for mom on Mother's Day.
  Begin by sectioning out the hair on the top of the head from ear to ear.  Go ahead and create a part in that new section so that you end up with two halves.  Plait each half into a Regular 3-Strand Braid and secure them at the ends with elastics.  Now pull the rest of the hair back into a ponytail.  Break that ponytail into two equal sections and braid each of those as well.  You should now have 4 braids.
  Take your two top-side braids and cross them over the top of the middle elastic and then wrap them around each other in no particular order so that it makes a bun with the middle two braids still hanging down in the center.  The ends of your braids should be flaring out underneath the bun and you can secure them together with another elastic. 
Now take your right center braid over the bun and tuck it underneath the right side braid that is coming across the head.  Do the same with the left side as well.  Form them both into little leaves on the side of your bun and then wrap the remainder of those braids in with the rest of the bun to create your rose.  Have the ends of those two braids flare out underneath the bun as well and secure those in with the other ends by using one last elastic.  Tie a colored ribbon over those elastics to hide them and you're all set!

Monday, May 7, 2012

Mother's Day Flower

I thought this would be a great hairstyle for Mother's Day because it's a simple flower and what mother doesn't love a flower on that special day?!  :)
Begin by pulling half of the hair back and secure it in with an elastic. 
Now go ahead and pull out little sections of that new ponytail and Barrel Roll them into the head and then secure them with bobby pins.  (You can see a video tutorial on how to do a Barrel Roll here.)  Keep sectioning out the rest of that ponytail and creating a ring of Barrel Rolls out of them but make sure to keep one small section in the very center of the ponytail separate. 
Once all of the rolls are made you will take that center section and twist it as tightly as you can.  When you can't possibly twist it anymore, let it twist itself up into a "worm" in the center of your flower.  You can bobby pin that into place as well and then hide the bobby pin with some hair from your Barrel Rolls.  Now you've got a beautiful flower just perfect for Mother's Day!

Friday, May 4, 2012

Friday's Film: 4 Strand Headband With Flower

My princess came up with the idea for this hairstyle this morning and it's a fairly simple one.  Be sure to start with wet hair and have some small elastics, bobby pins, and hair accessories ready. 
I apologize for my voice, I had just recently gotten over a cold. 
For our finished product I went back and did one more 4 Strand Braid and another flower. 

The 4 Strand Braids do not need to have the "squished" effect but I was just looking for something that wasn't so linear. 
My flowers are different sizes but you can really shape them to be any size you like. 
I left the rest of the hair straight down but you can finish it off any way you like.

Wednesday, May 2, 2012

Bun Spiral

 My princess has her hair in buns all the time for swimming and dance but they always seem to be falling out when her activity is over. 
 I grabbed this handy little tool in the hopes that it might solve our problem.  It's called the "Bun Spiral" by Goody and I picked it up at Walgreens. 
You start by pulling all the hair back into a ponytail as usual.   
Now twist that ponytail and wind it around your elastic to create your bun.  Tuck your ends under as best you can at this point.  Now grab the Bun Spiral and slip it over the bun - so that the purple tips are next to the head. 
Now simply spin it clockwise until it won't spin anymore and this locks it into place.  I have to admit that I was pretty impressed.  It holds that bun VERY tightly in place and her bun looked just as beautiful after school as before.  I give this one a thumbs up!