Showing posts with label curls. Show all posts

Monday, April 9, 2012

Simple Half Inverted Pull-Through

Here's a VERY simple hairstyle that is not really "original" but it's one I thought I'd throw out there for those mornings when you want something cute but don't have a lot of time.
 It's simply an Inverted Pull-Through using only half the hair.
Start by styling the hair how you would like - curls, straightening, etc.  We had some waves from braids the day before that we used.
Section the hair out from ear to ear and pull that top area into an elastic.   
Now grab your Topsy Tail and poke it upwards underneath the elastic.  Feed the hair through the loop and pull it up and through.  (Creating and Inverted Pull-Through as opposed to the regular Pull-Through.)     
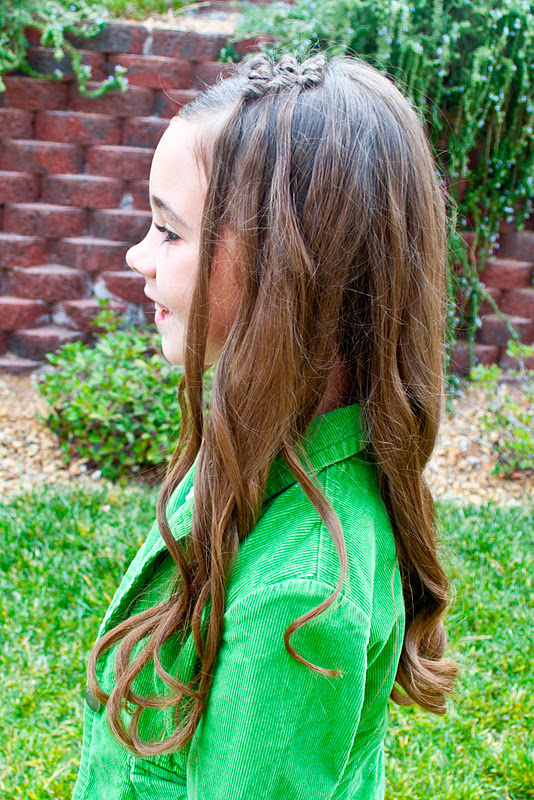
Spread the hair out a bit so that it's evenly falling down.  Now your elastic is hidden and you have a cute little "poof" in the middle of the head.
Nice and simple yet different from an everyday look.  :)

Monday, March 26, 2012

Perfect Picture Hair

*FACEBOOK FRIENDS - Don't forget about the Easter Hairstyle contest we have going on.  A winner will be picked on April 7th!  If you have not yet, go "like" our Facebook page to participate in the contest!*

My princess had her class pictures at school the other day and she and I had to come up with a style that would look nice for the photo.  Typically you want to try to have the hair down in a picture because it tends to photograph better than if it is pulled back.  This is what we came up with:
It shows the pretty length of the hair without being too over-bearing.
First of all we took a Waver Iron and put the waves throughout her hair.  I use my original Boss waver from the late 80's but the new ones with the 3 rolls work great too.  We added the waves because it give a soft look to the hair and seems to photograph well. 
Next, we placed the faux hair headband that we purchased at Sally Beauty Supply in her hair.  (These come in several different hair colors.)  I love this thing because it looks like I've put in a lot of work but it's just a headband that slides on and off.  I did make sure to secure the headband so that it wouldn't slip and you can see how I did that in a previous post found here.
And finally we added some hair pins that matched her outfit to complete the look.  Pretty simple but beautiful!

Friday, November 25, 2011

Friday's Film: Long Knots

We posted a video last week showing you how to do some flat iron curls and this is the other part of that same hairstyle.  These are called Long Knots and they add a fun look to lots of different styles.  (I apologize for some of the instruction being out of the frame but hopefully it won't hinder the basic idea.)
Remember that you can secure your Long Knots with bobby pins if you would like to.
Like I said in the video, you don't need to secure the bangs before hand but we chose to do that for this particular style. 
We only did 3 knots here but you can do as many as you like and they can be as big or as small as you like just depending on how much hair you grab. 
Her ends were just left hanging for this style but you can pull them into braids, buns, or ponytails as well. 
We just finished it off with some flat iron curls and we posted the video for those last Friday. 

Friday, November 18, 2011

Friday's Film: Bella Curls (Flat Iron Curls)

Well, it is a big day today!  It's the release of the new Twilight movie, "Breaking Dawn - Part 1".  This is exciting for us here in this house and all of the kids went to school wearing Twilight gear that my husband and I got on our trip to Forks, WA.  (Yes!  FORKS!!!)  :)  I'm gearing up for a big party tonight with some more of my Twi-hard friends and I thought it would be fun to do a Twilight themed video for you.  These are basically Flat Iron Curls but that doesn't sound as fun as "Bella Curls"!
*Remember that it's always better to spritz the hair first with a heat protecting spray.* 
You can see that the curls are nice and loose and look very natural. 
We have her bangs tied under and some Long Knots on top and I will have a video for those next Friday. 
Her curls lasted throughout the day and looked beautiful. 
I actually did this video on Sunday so you don't get to see her cute Twilight clothes but you'll just have to pretend.  :) 
Have a great day and GO TEAM EDWARD! 

Friday, October 21, 2011

Friday's Film: Barrel Roll Braid

*NEW* We are now on Facebook!  Just search "Princess Piggies" and it will pull up our page.  Click "like" and you will make my whole day!  :)  Also, feel free to share pictures of your hair creations because I'd love to see all of your hard work!  I will be uploading pictures there as well so you will have a photo gallery to view at your convenience!  Hooray - Princess Piggies is moving into the networking era!  :)
The hairstyle today is called the "Barrel Roll Braid" and it's an easy updo. 
 I've included a video but have only showed the basic steps on the video because it would have been too long to film from start to finish. 
Begin by pulling the top part of the hair - from ear to ear - into an elastic.
Also, in these final pictures I divided the starting ponytail into 3 Barrel Rolls and the film only shows 2. 
(Hopefully we're slowly figuring out our lighting issues.)
Here's a side view for you.
You can see how I just rolled the last strands of hair up into the braid itself instead of to the side.
The updo was beautiful for the first part of the day and we were left with some gorgeous loose curls for the rest of the evening.

Wednesday, August 31, 2011

First Day of 3rd Grade Hair

My princess started 3rd grade this week and she was so excited for her first day of school.  She had the Bottom Braids and Bun hairstyle the day before for church (which we created a video for and will be up soon!  Woohoo!) so we just used the waves from those braids.  You can also get waves by just braiding wet hair the night before or using an electric waver.
 
We wanted kind of a Bohemian look so we basically just made a short off-centered part on the top and then gathered some hair back into an elastic. 
We did leave some hair loose by the ear so that it was not a full half-up hairstyle. 
We tied a ribbon over the elastic and just let the rest of the hair fall in waves.   It was very simple but very beautiful.  It did not take very long either which is perfect for those morning that you just need to get out the door!
She had a great first day of school and had many compliments on her hair.  

Monday, August 29, 2011

Baptism Picture Hair

My princess is getting baptized at the end of this week and we wanted to get some pictures taken for the invitations.  This is the hairstyle that we came up with:
First I completely dried her hair and then I began by creating an off-centered diagonal part in the front.  (I had more of the bang-line on the right side of the diagonal.)  I then sectioned out the hair from one ear to the other so that I was only working with the top half of hair. 
I tied off the left side of my diagonal part so that it was out of the way while I worked with the right.  You'll want to create four even sections out of that side and make sure they run parallel to the diagonal part.  Secure each small area with an elastic at the back of the section. 
 Now move over to the left side and create 5 equal sections. 
 My first 3 section came straight off of the diagonal part instead of running parallel to it.  This just breaks up the design a bit.  Secure each of those areas with an elastic at the back of the section as well. 
 Now you should have 9 small ponytails at the top of the head.  Take each of those ponytails and cross them over and under each other in a weaving pattern.  Go ahead and secure the ends together at the back of the head with bobby pins creating an "X".  
You can either leave the remaining hair straight or curl it like we've done here.  We used a spiral curling iron to get these ringlets. 
We finished it off by giving it a good spray with hairspray and then adding some flower hair pins and velcro pearls. 
The hair not only held up through her photo shoot but all the way through the end of the day too. 
The pictures turned out great and she's very excited for her big day this Saturday!

Wednesday, July 27, 2011

Curlformers

We use these all the time but I've never down an official post on these overnight curlers.  They are called Curlformers and their link is here. 
They are really fast to put in and they don't create the tight curls that the small pink sponge curlers do.  My princess think that the larger curls are more "grown up".  :)  I start right after she's had a shower or bath so that the hair is completely wet.
  I style the hair the way I want first and then I put the curlers in. 
 You can either have your princess sleep in the curlers overnight or just keep them in for about 3 hours to dry.  
 They hair was styled before you put the curlers in so you don't have to worry about ruining your curls. 
Our style here was a simple Pull-Through on the top of the head and then I pulled half of the hair up in the back.  I made sure not to include that Pull-Through in my half-up hair because I wanted the curls hanging down.
The end result are beautiful, soft curls that will last the whole day through! 
 I've only been able to find these at Sally's but I've also heard that they have a knock-off brand on Ebay.  :)

Monday, July 11, 2011

Basket Braids

Here is a different idea on an old favorite.  We love doing weaving of any type in the hair so we decided to  give it a try with braids.  This one does take a bit of time so make sure you have plenty set aside.  Start by creating an off-centered part in the bang line. 
 Create two more parallel parts on both sides of the part so that you now have two long sections.  Divide each of those sections into 5 equal pieces of hair and create a 3-Strand Braid out of each piece.  You should now have 10 small 3-Strand Braids.  Now go ahead and section out a -inch hick section of hair from the part right down to the ear on each side.  (Create this part parallel to the bang line.)  Those two new sections of hair can be divided.   Make 4 equal sections on the large side of the part and 3 equal sections on the smaller side.  Braid each of those sections into 3-Strand Braids.  You should now have 7 new 3-Strand Braids along the bang line.  Take the very front braid from the smaller part and include it in with the 3 braids on the bang-line of the smaller side of hair so that you now have 4 braids along each side of bang-line. 
Grab the two bang-line braids that are closest to the part (on either side) and bring them to the back of the head where you will join them with an elastic.  Now grab the next bang-line braid on each side and pull those to the back of the head.  You will combine those with an elastic as well but also make sure to include the hair from the braid combination above it.  Do the same thing with the last two braids on the bang line so that they all eventually meet up in the back of the head and you should have 4 elastics in a row in the back of the head. 
 Start with one side of the part and grab the braid nearest to the front of the head.  Pull the braid through a Topsy-Tail and feed it with an in-and-out motion straight down through the braids that you pulled back.  When you reach the last braid you will actually feed your Topsy-Tail through the plates of the braid to hold it in place.  Unplate any remaining braid from the one you just used to weave.  Move to the next braid on that same side and weave that one as well, just be sure to alternate your in-and-out pattern. 
 Do that with the rest of the braids on that side of the head and then move to the opposite side of the head and repeat the same steps. 
REMEMBER to pull the braid right through the plating on the bottom braid to hold it in place. 
 We finished off her hair by using the Conair Spiral Curling Iron and adding some curls. 
We individually curled each of the woven braids for a fuller look.  Our final step was to add some hair bows over the elastics in the back of the head.