Monday, October 31, 2011

Haunted Hairstyle

HAPPY HALLOWEEN everyone!!!  We love this time of year because it is so fun to dress up and pretend.  We also love the candy - of course!  We have one final Halloween hairstyle today and it's called the "Haunted Hairstyle". 
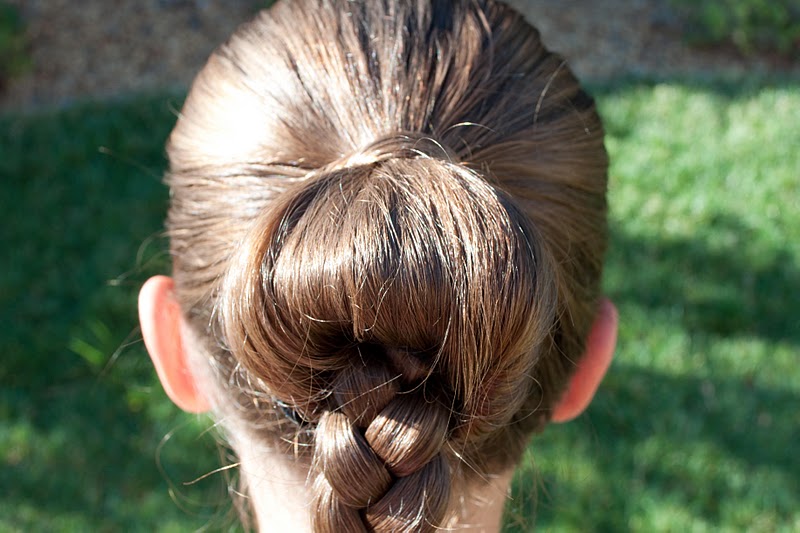
Start by pulling all of the hair back into a tight ponytail.  Now grab a bun mold or a rolled sock and place the ponytail through it.  Spread the hair evenly over the bun mold and then wrap another elastic over the hair and mold to secure it into place. 
Comb the remaining hair, outside of the mold, straight down so it looks like a ponytail. 
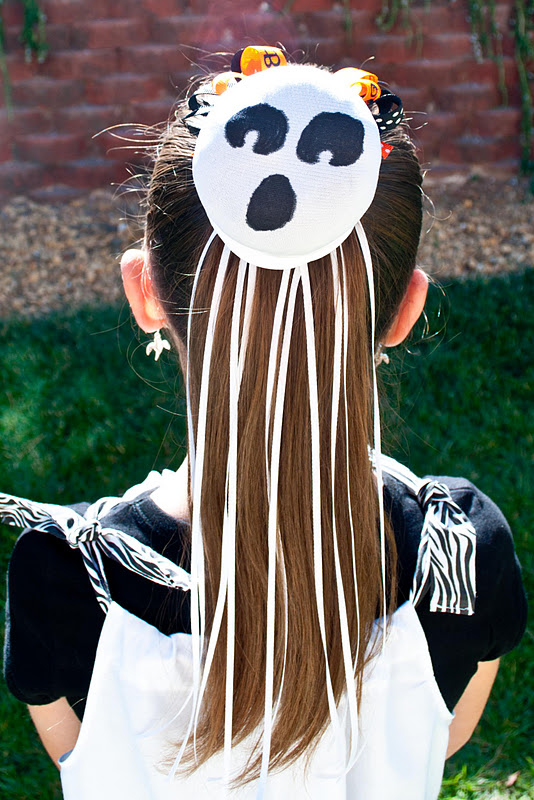
Now grab a white knee-high stocking.  (I used the second one from the pack that I bought at the dollar store - I used the first on The Ghost.)  Draw a face on the knee-high with a permanent marker.  (Place cardboard inside the knee-high to prevent bleeding.)  Place the face part of your knee-high directly over the bun mold and then stretch the rest over.  You can adjust it as needed.  Add one final white elastic over the mold to hold the knee-high in place. 
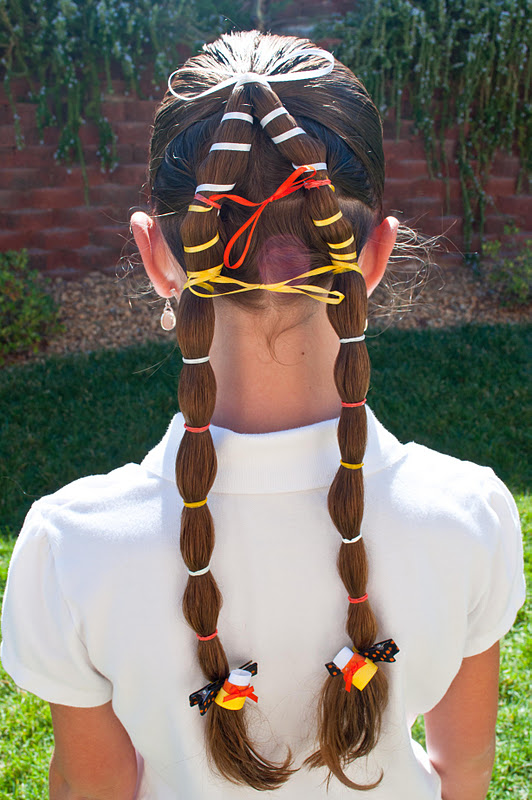
 Grab some white ribbon for your last part.   Measure the ribbon against the length of the hair hanging down and then double it so that it is twice as long as the hair.  You can cut as many strand of ribbon as you like.  Take each strand and tuck them through that final elastic that you placed over the mold.  Make sure the middle of your ribbon is directly under the elastic so that you have two hanging strands.  You can tie the ribbon onto the elastic if you like but we did not do that and the ribbon held just fine.  You can either leave the hair straight at this point like we've done or you can curl it.  (I personally wanted to curl it but we ran out of time.)  Add a hair bow to the top of your ghost and you're all finished! 
My princess had a ghost in her hair to match the ghost on her pillowcase dress!  We hope you all have a safe and fun Halloween!

Friday, October 28, 2011

Friday's Film: The Ghost

We wanted to do a fun, yet simple, Halloween hairstyle for you this year so we came up with The Ghost. 
You will need a pair of white knee-high tights and I just found mine at the local dollar store.  Draw a ghost face on one stocking with a permanent black marker.  (Tip: Place some cardboard inside the stocking before drawing the face on to avoid any bleeding.)
Here are some pictures of the finished product topped with a ghost hair bow.
 It held really well all day long and everyone was stopping my princess to take a look at it.
 Happy Haunting!

Tuesday, October 25, 2011

Candy Corn Revisited

I had done a post last year called Halloween Hairdos: Candy Corn and here is a picture of it:
I decided to try revisiting this hairstyle again this year and tweaking it a bit so that it is easier.
I started by pulling the hair half up - from ear to ear - and securing it in an elastic at the back of the head.  Divide the hair below the elastic in half by creating a part directly down the center.  Go ahead and divide your ponytail into two equal parts as well. 
Start by working on the left side and divide that in half horizontally so that it gives you two equal sections on that side.  Combine the left half of your ponytail with that top-left section of hair and secure it with an elastic.  Make sure to pull that new elastic a bit more to the left than your original ponytail but not all the way to the left.  Now combine your most recent ponytail with the bottom-left section of hair and secure it with a new elastic ALL THE WAY TO THE LEFT so that you have a triangular shape happening.  I chose to use white orange and yellow elastics but clear will work as well if you don't have the colors.  Go ahead and repeat those steps on the right half of the head. 
 I also finished off the ponytails by alternating the white yellow and orange elastics all the way down to the ends of the hair but this is optional.  Now grab some ribbons and a plastic yarn needle.  Start with white on the top and begin with a bow right over the main elastic.  Now continue wrapping the ribbon around the hair until you get to the next elastic.  At this point you will cut off any excess white ribbon and tuck the ends into the elastics.  Grab your orange ribbon and tie a large bow which you will place right over the middle part.  There will be no wrapping with this color but you will tuck your ends into the elastics to secure them.  Your final ribbon will be yellow and you will start again by tying a bow and placing it over the center part.  Now thread your needle and wrap the ribbon through the bottom elastics and the UP the hair and you will tuck your ends into those middle elastics.  (All of your ribbon ends will be secured and tucked into those middle elastics.)  Cut off any excess ribbon and hide the ends inside the hair. 
We finished our hairstyle off by adding some candy corn clips at the bottom of the ponytails since she had a whole candy corn theme going on. :)  (I found the idea for her outfit on Pinterest and I was so happy with how it turned out!  Plus I made it big enough for her to wear again next year!)

Friday, October 21, 2011

Friday's Film: Barrel Roll Braid

*NEW* We are now on Facebook!  Just search "Princess Piggies" and it will pull up our page.  Click "like" and you will make my whole day!  :)  Also, feel free to share pictures of your hair creations because I'd love to see all of your hard work!  I will be uploading pictures there as well so you will have a photo gallery to view at your convenience!  Hooray - Princess Piggies is moving into the networking era!  :)
The hairstyle today is called the "Barrel Roll Braid" and it's an easy updo. 
 I've included a video but have only showed the basic steps on the video because it would have been too long to film from start to finish. 
Begin by pulling the top part of the hair - from ear to ear - into an elastic.
Also, in these final pictures I divided the starting ponytail into 3 Barrel Rolls and the film only shows 2. 
(Hopefully we're slowly figuring out our lighting issues.)
Here's a side view for you.
You can see how I just rolled the last strands of hair up into the braid itself instead of to the side.
The updo was beautiful for the first part of the day and we were left with some gorgeous loose curls for the rest of the evening.

Wednesday, October 19, 2011

Halloween Hairstyles Recap

I wanted to post a few of our favorite Halloween Hairstyles since we are getting close to the big day! You can also click on "Costume Hair" or "Halloween" in the labels section on the sidebar for more ideas.  Just click on the name beneath the picture and you will be taken to the original post with instructions!
 The Great Pumpkin

The Coffin

Spider Rings

"BOO"

The Mummy

Monster Eyes

Spider Web

Cemetery

Candy Corn

Pumpkin Patch
Hopefully these will be some fun ideas for you to try and celebrate with!

Monday, October 17, 2011

Braided Borders

This hairstyle is very elegant and pretty but it is only successful if your princess has medium to long hair.  We call it the Braided Borders because everything is outlined with a braid.
Start by creating an off-centered part at the top of the head that is about 4-5 inches long.  Next you will divide out that top section of hair by creating another part from one ear to the other.  Start on one side of your off-centered part and divide it right in half all the way down to the ear.  Have your princess hold the front part in her hand.  (The bang part)  Move over to the other side of the off-centered part and do the same thing.  You should now have 4 sections at the top of the head.  Your princess should be holding the front two bang sections so you can work with the back two sections.
  Divide the section in half and comb the bottom half closest to the ear straight down because you will only need to work with the top half.  Create a Regular 3-Strand Braid out of that top half and secure it at the end with an elastic.  Move to the opposite side of the head and do the exact same thing. 
Comb the remaining hair (except for what your princess is holding) straight down so it is nice and smooth in the back.  Now take the two sections that your princess has been holding and spray them with some water and then slick them down against the head. 
You will pull both side around to the back of the head where you will join them with an elastic.  Make sure you pull these band OVER the rest of the hair but UNDER the two 3-Strand Braids you created.  (Hopefully that makes sense.)
Gather all of the hair that is hanging straight down - including the small ponytail from your joined bangs - and create a tight 3-Strand Braid out of them.  Secure that braid at the bottom with an elastic.
  Now grab one of your 3-Strand Braids from the side and wrap it down under you big main braid, then up along the opposite side of it, and finally you will tuck it in behind the elastic that combined the bangs.  Bobby pin that elastic into place.  Repeat the same steps with the final remaining braid and you are all finished. 
 It's a nice elegant hairstyle that will hold tightly throughout the whole day! 

Friday, October 14, 2011

Friday's Film: 5-Strand Braid

I just wanted to let you all know that we are working on some things for better accessibility and we now have labels on the side bar.  We are also working on a Facebook page so that we will have a quick access hairstyle gallery for you.  Thank you to the wonderful comments and suggestions because they have all been so helpful!
We tried this Friday's Film in a new location and it's a bit brighter than before but I'm going to also try it with a spotlight in the future. 
This is a 5-Strand Braid and it is one of our favorites.  You can search "Multiple Strand Braids" on the side bar or simply type in "5-Strand Braid" in the search box to see more examples.
We us this style ALL the time and hopefully this will make the idea a bit easier for you! 

Wednesday, October 12, 2011

Rib Cage Braid Bun

*Note* Thank you so much for your comments on the last video and I will be searching for a better place to film that has more light!  I agree that video was much too dark.  I was trying to do it in a location where my 3 younger boys would not bother us as much but there is just not enough natural light so the upcoming films should be better!  :)
Today we are implementing that Rib Cage Braid in this hairstyle.
Start with wet hair and pull it all back into a high ponytail. 
Separate the ponytail into 3 equal sections and create a Rib Cage Braid out of each section.  (Remember to braid all the way down to the very ends of the hair before securing it with an elastic.)
 Pull the top bit of your braids up above the ponytail elastic and pin them into the hair so that the elastic is hidden.  Pulling up top of the braid is also what helps to flair out the "Rib Cage" part of your braid. 
Now pull the bottom of the braids up under the main elastic and pin them into place.  I have rolled these ones twice because my princess has quite long hair but that is optional.
Flair out the bits of your braid if you need to and then give it a squirt of hairspray for hold. 
You can leave it just plain or add a hair accessory to the top.  This hairstyle held really well and she was even taken down to the office at her school so they could take a picture.  (That made her whole day!)  

Sunday, October 9, 2011

Princess Piggies Is Now Live On Your Mobile Device!!!

For all those on the go, please add princesspiggies.blogspot.com to your bookmarks or favorites on your mobile device and you will have instant access to all your favorite hairstyles on the go. I know it can be hard running from place to place and have enabled easy mobile device viewing. Give it a try and thank you for visiting!!!

Friday, October 7, 2011

Friday's Film: The Rib Cage Braid

This is a cool hairstyle that would be great to use during this Halloween time.
 
We call it "The Rib Cage Braid" and it would be fun to add a skeleton head at the top for a creepy holiday hairdo.
As you can see, it is really quite simple.
It doesn't need to always start from a ponytail but it does make it a bit easier to work with. 
I will be posting a few hairstyles using this braid in the future so you can refer to this video anytime you need.

Wednesday, October 5, 2011

Hairagami With a Braid

Here's another fun idea of a hairstyle using the Hairagami. 
 
We found ours at Walgreen's but I'm sure they're at other places as well.
I started by pulling all of the hair back into a ponytail.  I then grabbed a small bit of hair that I wrapped around the elastic and tucked back in just to hide the elastic. 
 Next, I divided the ponytail into a top half and a bottom half.  I wrapped the top half into the Hairagami, rolled it into the head and bent it into place. 
I took that bottom half of the ponytail and created a 3-Strand braid out of it. 
I secured it at the bottom with an elastic and then pulled that elastic up inside the Hairagami and secured it in place with bobby pins.  This step is not necessary and it does look cute with the braid just hanging as well.