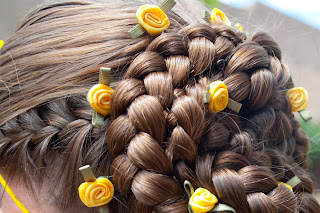
This is more of a formal hairstyle but we just used it for church one day.
Begin with dry hair and choose your favorite headband and place it in the hair. (The headband is optional - the hairstyle will work fine without it as well.) Pull a section of hair out in front of the headband right by each ear.
Now part out a 2 inch bit of hair all the way around the base of the scalp, from ear to ear. Throw all of the hair above the part up into a clip to temporarily keep it out of the way.
Now begin next to the ear on the right side of the head and create a French Braid along the base of the hairline. Your French Braid should be plated right over the top of the headband to help hold it in place. Once you've created your French Braid all the way to the nape of the neck, finish plating it as just a regular 3-Strand Braid.
Repeat the same steps over on the left side of the head. Now you should have 2 small braids right by the nape of the neck.
Take the clip out of the hair on top and comb it all straight back. Divide it in half and create a low 3-Strand Braid out of each half. You should now have 4 braids by the neck, two smaller and tow larger.
In no particular order, start wrapping the braids around themselves and bobby pinning them as you go.
Make sure you tuck the ends of your braids under the bun and pin them into place. Once your entire bun has been created you will want to spray it with hairspray for a good hold.
You can be finished at this point or you can add some small flower pins like we have done here.
We got lots of compliments on the style and it also created some beautiful waves in her hair for the next day!


6 comments:
Wow, that's so pretty!!! I love it! I think I need to invest in some flowery grips :)
That is gorgeous! I wish I were as talented as you, (and I wish you would do step by step pictures or video)! :O)
Love, Love, Love!!
I agree with Brooke, If you do this again could you do step by step pics.It is so beautiful, really want to try this one.
wow so pretty :)
vmryb3fli01
golden goose outlet
golden goose outlet
golden goose outlet
golden goose outlet
golden goose outlet
golden goose outlet
golden goose outlet
golden goose outlet
golden goose outlet
golden goose outlet
Post a Comment