These are some of the tips and tricks I've picked up along the way.
Hopefully they'll help!
The biggest tip is to ALWAYS wet down your daughters hair before styling. It will dry in place and hold MUCH better. Make sure that you dry any areas that you will be curling or straightening because it’s not healthy for the hair to apply high temperatures to it while it’s still wet.
Sitting Still – Start as young as possible with your girls and they will learn to sit more patiently and cooperate better.
-You can usually get them to sit still by playing a game with them (I.E. “I Spy”) or letting them watch TV, play with a toy, eat cereal, play on the computer or read a book while you do their hair. Also let them be helpful by handing you the items you need if they are old enough. Keep them interested by letting them pick their own hairdo’s too.
-When my daughter was little, I used to do her hair while she was in her highchair. I’d also let her suck on the spray bottle and that seemed to entertain her well.
Products – If your daughter has fine or hard to manage hair, think products! They help to add texture and also hold those stray hairs in place. Hairspray is the easy go-to product but also try gels, mousse, or pomades. I personally like the Garnier Fructis products because they’re not too expensive, they work well and they smell great. For super hold try “Got2b”, “Spiking Styling Gel” or “Blasting Freeze Spray”. Your hair WILL NOT MOVE! If you’re scrunching your daughters hair and she doesn’t have much natural curl, try adding two whipped egg whites to the hair along with the gel. This holds the curl really well but be sure to wash it out when the day is through! Also, we have very little humidity in our desert air so try to treat the hair with some type of leave-in conditioner on days you don’t wash it. Keeping the hair moisturized prevents breakage.
Shampoo and Conditioner - The brand does not really matter, it’s all just personal preference and what works best on your daughter. Change it up every once and a while because the hair adapts to certain products. The hair will react better if it’s not constantly being treated with the same shampoo and conditioner. You really only need to do this a couple times a year. Try not to wash the hair more than every other day unless it’s needed. Too much washing will dry out the scalp and hair.
Combs and Brushes – The Rat-Tail comb is the best and can usually only be found at beauty supply stores. It tends to make a better part and is great in wet hair. We use ours every day since most hairstyles call for it. The best brush is one that has a cushion on the interior that is made of plastic and not rubber. It glides through the hair with a lot more ease. Also, make sure that the bristles have round tips so it won’t agitate the scalp. Refrain from any brushes that have rubber handles because the hair can easily get pulled if it gets stuck to the rubber. (I know from experience!)
Hair Types – Thick hair tends to hold the styles best but thin or fine hair can still hold a style well as long as you use product to create texture and hold. You can also improvise with each hairdo for different hairstyles. (i.e. if you have short hair or bangs.)
Upkeep – Make sure you get the ends of your hair trimmed whenever they start looking raggedy, split, dry or get hard to comb through. There really is no time frame since everyone’s hair is different. It’s important to keep your hair trimmed up so it stays healthy.
Drying – You can either air dry or blow dry the hair and both ways work great.
-Air drying as often as possible will promote a nice healthy shine in your daughters hair. After washing, make sure you blot the hair with the towel instead of rubbing. Rubbing causes damaged cuticles and split ends. Apply detangler to prevent tearing while you brush. It also promotes healthy cuticles and shine. In the morning you just spritz it with the spray bottle and you’re ready to do your hairstyle.
-When blow drying, blot out as much water from the hair as possible. If not, you’ll be drying for a much longer time and the extended period of heat can damage the hair. Keep hair dryer at least 6 inches from her hair. Start at the roots and work your way out. Dry until damp because some moisture helps with the hairstyle. If you are doing a style that requires a heating tool, make sure you dry the hair completely. If you choose to blow dry, be sure to finish off with a cool blast of air as it closes the cuticles and provides a healthy shine. Find what works best for you and go with it.
Parts – It doesn’t matter which side of the head you choose to part the hair on. Parts work best with rat-tail comb. Your parts can be zig-zag, curved, straight or any other design you come up with. The more interesting the part, the more unique the hairstyle will be.
Sunscreen in Parts – There are 3 options and you just need to find what you like best:
-Spray-On Sunblock applied to the parts. (can tend to make the hair look greasy but is fast.)
-Sunblock applied with a Q-Tip. (Effective but you always need Q-tips when you’re out.)
-Use a 50 spf sunblock stick. (My personal favorite.) It’s nice and portable and easy to apply. Hold the stick at an angle and run it along the part. Run your finger along the part to press it into the scalp and also remove and residue that may be left on the hair.
Sharks – Sharks are the tiny bumps that sometimes stick out of your otherwise perfect braid. They are completely annoying but are easy to fix. Grab a bobby pin and place it directly over the shark. Insert the bobby pin into the braid so it’s hidden and the shark will disappear right along with it.
Bands/Elastics - *Cut out small elastics to avoid tearing the hair or causing discomfort for your daughter*
(I like to use a seam ripper from my sewing kit.)
You can also double up on rubber bands in one hairstyle for extra hold if needed.
Types: (I find that “Goody” seems to be a great brand)
Ouchless Thick Bands – for single ponytail or holding bunches of hair together or buns
Ouchless Thin Bands – for smaller braids and ponies
Ouchless Clear Plastic Bands – for tiny braids, pull-throughs or ponies
Ouchless Colored Bands – for smocking or decorative hair weaving
*AVOID any type of rubber band because they pull out the hair and ALWAYS need to be cut out instead of just removed.
Organization – Keep Clips, elastics and pins separated in clear craft/tackle boxes. This way you can see what is in your boxes and everything stays neat and tidy. One way to have access to your ribbons is to place your spools on a dowel and then hang that dowel by two hooks on your bathroom wall. Another great tip is to use hanging door organizers. They give you more storage and they’re out of the way. Keep brushes, combs, your spray bottle and other often used tools readily accessible. We have ours in a small caddy on the bathroom counter.
Bow Holders – There are several ways to display your daughter’s flowers and bows.
-Hang your bows on pieces of ribbon attached to the wall. I attach the ribbon to a plastic craft “O” and then hang that on a 3M Easy Release wall sticky. (I don’t know what their official name is.) The flowers and bows easily clip to the ribbon and they become nicely organized and easy to see.
-My favorite is the magnet board with flowers stuck to circle magnets. Not much storage but totally darling!
-A decorative organizer is a vase with tall/skinny wooden skewers painted green in it. The flowers are clipped to the top of the skewers. It looks like a vase full of flowers in your room but it’s actually hair bows!
-A simple solution is a flat painted board with different ribbons attached down it. The flowers then clip to the ribbons.
-The “no work needed” solution is an over-the-door shoe organizer that you just put all of your bows into.
Getting Your Bows to Stay In – Simply wrap a small elastic around the back of the clip and through the front prongs. This will help the bow to stay in place and not slide around on the hair. It’s also helpful to line the inside of your clips with a small piece of shelf liner rubber. The liner helps the clips to hold to the hair and not move as much as without the liner. I do both because I’m sick of losing bows and flowers all the time.
Frayed Ribbons – Treat your frayed ribbons with a lighter or wood burning tool to singe/seal the edges and prevent any further fraying. (Important: do not attempt to do this if the ribbon is already in the hair!)
Cleaning Your Irons – Don’t you just hate that residue that builds up from hairspray on your irons? Start with rubbing alcohol as this will clean most problems. If you have a deeper residue problems you can try ammonia, a cotton ball with nail polish remover on it, or a bit of over cleaner. There is also a product at Jo Ann's called "Hot Iron Cleaner" and it works great. Any of these will work and will help keep your irons in top condition.

 I don't think she knows all about the movie yet but I thought the teachers would get a kick out of her.
  I made these bows yesterday and stole the pictures from the Eclipse crown we got at Burger King.
  I just pulled her hair up into some Messy Buns.
  Messy Buns are supposed to look ratty and disorganized and one will never look like another.
  She had her Eclipse Tu Tu on for the pictures but, even though she begged, she didn't wear it to school. :)
  Are you Team Edward?
  Or Team Jacob?
 It's called the Half-Up and basically you only gather the hair above the ears into a ponytail.
 Once the hair is in the ponytail you can pull a bit of the hair forward to give a puffy look on top.
  You can also cinch the hair behind the elastic to make the ponytail look fuller. I didn't want a flower or bow to his the fullness so I inserted some bobby pin accessories.
  We use these a lot because they are just craft embellishments glues to a bobby pin and they give that floating effect. These are really easy to make and they look beautiful in updos and buns.
 You'll want to start with a straight part down the middle. (The lacing will cover the part so it really doesn't need to be anything fancy.) Separate the hair and create a Dutch Braid on each side. You'll want to choose your color of ribbon and grab a "yarn" needle. (They are thick and plastic and are usually found by all the yarn in the craft areas.)
  Thread the needle with the ribbon and begin lacing at the front of the head. Now learn from my mistake and make sure that you're threading is even on both sides so that the strands of ribbon cross over each other right above the part. My ribbons got a bit off at times and I wish I'd been more careful about that. (Oh well, now I know for next time.)
  The stitches are made by taking the needle through one of the braid plates on each side and then alternating the ribbon on each side. You want it to look like you're lacing a corset - hence then name. :) I stitched all the way down through her braid just to give it a finished look.
  You can use as many colored ribbons as you want and be creative with it.
  She wanted to incorporate one of her "colors" in her hair today. You can pick these up at Sally's in tons of colors and they're about 18 inches long. (You can cut them if they're too long for your princess's hair.) They have a little comb at the top of them that slides right into the hair or you can combine it in an elastic like we've done.
  The weave is made by sectioning the ponytail into 3 strands with the colored hair being your 4th strand. Simply take the 4th strand and weave it over and under the other 3 strands.
  Continue weaving back and forth until you come to the end of the hair. This looks really cool with your 4th strand being normal hair as well.
 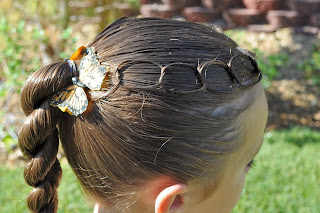 Just grab a small section of hair from the front of the head and separate it into two pieces. Wrap those pieces the same way you would when you start to tie your shoelace and pull it tight.
  Repeat that same step again but this time don't pull it tight and you'll create a ring. Continue making the rings as far back as you would like.
  Do the same with another section of hair from the front of the head. Have your princess hold the two links while you gather the rest of the hair into a ponytail. Add those links into the ponytail and secure it with an elastic.
  Finish off the ponytail however you like - we've done a Corkscrew. Spray the links really well with hairspray and your daughter is set to go!
 My daughter has two bookshelves flanking her bed and we have these vases on a shelf on each side. It's a fun way to store your flower clips and add some color to the room. The stems are simply skewer sticks from the grocery store that I've painted green. The flowers easily clip on and off and there doesn't have to be any order to them. There are many types of magnet boards out there you can use and this is one of my favorites. The hair clips will just cling right to the black circle magnets on the board. This one is also nice because it has these looped ribbons on the bottom that are great for holding those tricky headbands.
  I was in Target recently and came across these ribbon boards in their dollar isle. They were in the $2.50 section so I bought 4 of them. I only had to make a $10 investment and now we have more clip storage behind her bedroom door. That was a pretty good deal to me! You can find ribbon boards like these all over or you can make your own so that it's personalized for the room.
  Inside her closet we have a wall of 1 1/2 inch thick ribbons that we clip her bows to.
  The hanging ribbons make the clips easy to see and you can squeeze several together.
  On the back of my daughters door we have this hanging organizer that my sister gave me. I'm not sure where she got it but I've seen similar ones at Wal-Mart and Target and also at some teacher supply stores.
  This one is nice because it maximizes our space thanks to it being reversible.
  I love the look of ribbon in my daughter's hair, whether it's weaved in or just tied on the ends so I like to have it right within reach when I need it. These ribbons are hanging on her bathroom wall. They're great because I just stuck a dowel through all the spools and placed the dowel on two wall hooks. The spools spin freely and I can take the dowels on and off easily if I want to add new ribbons. I also keep a pair of scissors hanging on one of the dowels so I'm all set. (This is also a nice idea for a craft room.)
  Last but not least are the handy craft boxes. I get mine from Wal-Mart for $2.00 in the craft section. They come in two different designs, squares or rectangles, and I find that they're both really nice for different reasons.
  The square one holds the small alligator clips and the rectangle one is great for the bobby pin accessories.
  These craft boxes are also the best way to successfully organize your colored elastics and hair beads.
  She wanted to wear her "Hair Tu Tu's" so we decided to do Ballerina Buns.
  Start by parting the hair down the middle however you like.
  Pull each side up into a ponytail and braid it. Now tightly twist the braid around itself until you have a bun and bobby pin the loose ends in.
  We love to use our "Hair Tu Tu's" when we do our buns but you can use any accessory you want. ("Hair Tu Tu's" are basically just a large elastic with various ribbons tied around it - VERY easy to make!)
  We finished her hair off by spraying it with spray glitter so that she would sparkle like her shirt. (It's hard to see in the picture but the stuff works great!)
 Once it's in the elastic, section it out into five equal pieces.
  This is where it gets a bit tricky... Start with the outside section on one side and take it under the adjacent section and over the following section. That outside piece should now be right in the middle. Grab the outside section from the opposite side and do the same thing - under the adjacent piece and over the next piece until that section is in the middle. Continue this down the entire braid, rotating from right side to left side.
  I know that probably sounds really confusing and it does take a little practice to get your fingers where you want them.
  Good luck and it's worth the practice!
 Next you're going to section out an equal portion on each side and secure it with a colored elastic of your choice.
  Section out a second bit of hair on each side, add in the first small ponytail and secure it all with another elastic. You can make your sections as far apart or close together as you like.
  Just continue down the scalp sectioning out hair and securing it with an elastic.
  When you get to the bottom you can choose to continue wrapping elastics around the hair like I've done or you can just leave the ponytails hanging.
  Her elastics perfectly matched her shirt because it's important to accessorize wherever possible. j/k :)
 First section out the hair that you want to braid and just create a traditional 3-strand braid but make sure that it's a bit loose. (This works best when the hair is damp.)
  When you're at the end of your braid, hold the middle strand and simple "squish" the other two strand up towards the scalp. You can spread out the squish to however tight or loose you would like it.
  Now just add those braids with the rest of the hair to make your piggies on both sides. We went ahead and made Hawser Braids in her piggies.
  Hawser Braids are essentially two Corksrews twisted together.
  A quick spray and she's all ready for church!